Prototyping quick(ish) start guide
Make code-based prototypes at Stripe
This guide will help you learn how to make code-based prototypes. The processes here will translate to the ability to build real websites (that you can sell for real money), too.
🛠️ Get setup
A few things need to be installed prior to utilizing the codebases that have been constructed for code-based prototyping at Stripe. Don't worry about understanding this stuff too much right now. Most of it is a one-and-done type task.
1. Install Homebrew
HomeBrew is a package manager for macOS. It makes it easier to install other stuff. To check if Homebrew is installed, copy/paste this into terminal and hit enter:
brew -vIf a version number is not returned, install HomeBrew following these instructions or paste the code below into a terminal and hit enter:
/bin/bash -c "$(curl -fsSL https://raw.githubusercontent.com/Homebrew/install/HEAD/install.sh)"2. Install NodeJS and Node Package manager (NPM)
NodeJS lets us create servers, web apps, and command line tools and scripts with JavaScript. NPM lets us use other code from across the internet in our websites. First, to check if it's installed, copy/paste this into your terminal and hit enter:
node -vIf it doesn't return a version number, install NodeJS via Homebrew by copy/pasting this into terminal and hitting enter:
brew install node3. Install nodenv
Nodenv helps us manage which version of NodeJS we're using. To install it, copy/paste this into your terminal and hit enter:
brew install nodenv4. Create a GitHub account
GitHub is where we'll store our code. If you don't already have a personal GitHub account, click here to go sign-up for GitHub. Pro-tip, make your GitHub handle your name, if you can—like mikestilling.
5. Download GitHub Desktop and Cursor
GitHub's desktop app will make it a whole lot easier to interface with Git. To download GitHub Desktop, click here. After installing it, sign in to your GitHub account from within GitHub desktop.
Cursor is fork of VScode that more naturally integrates AI. It will help explain/write code as you get started with it. Download Cursor here.
6. Use the Helm template
Slack @mikestilling your GitHub handle to get access to the Helm template. After getting access, click here to view the project in GitHub.
In the top right region of the GitHub UI, you'll see a button that says "Use this template". Click that, and then select the "Create a new repository" option.
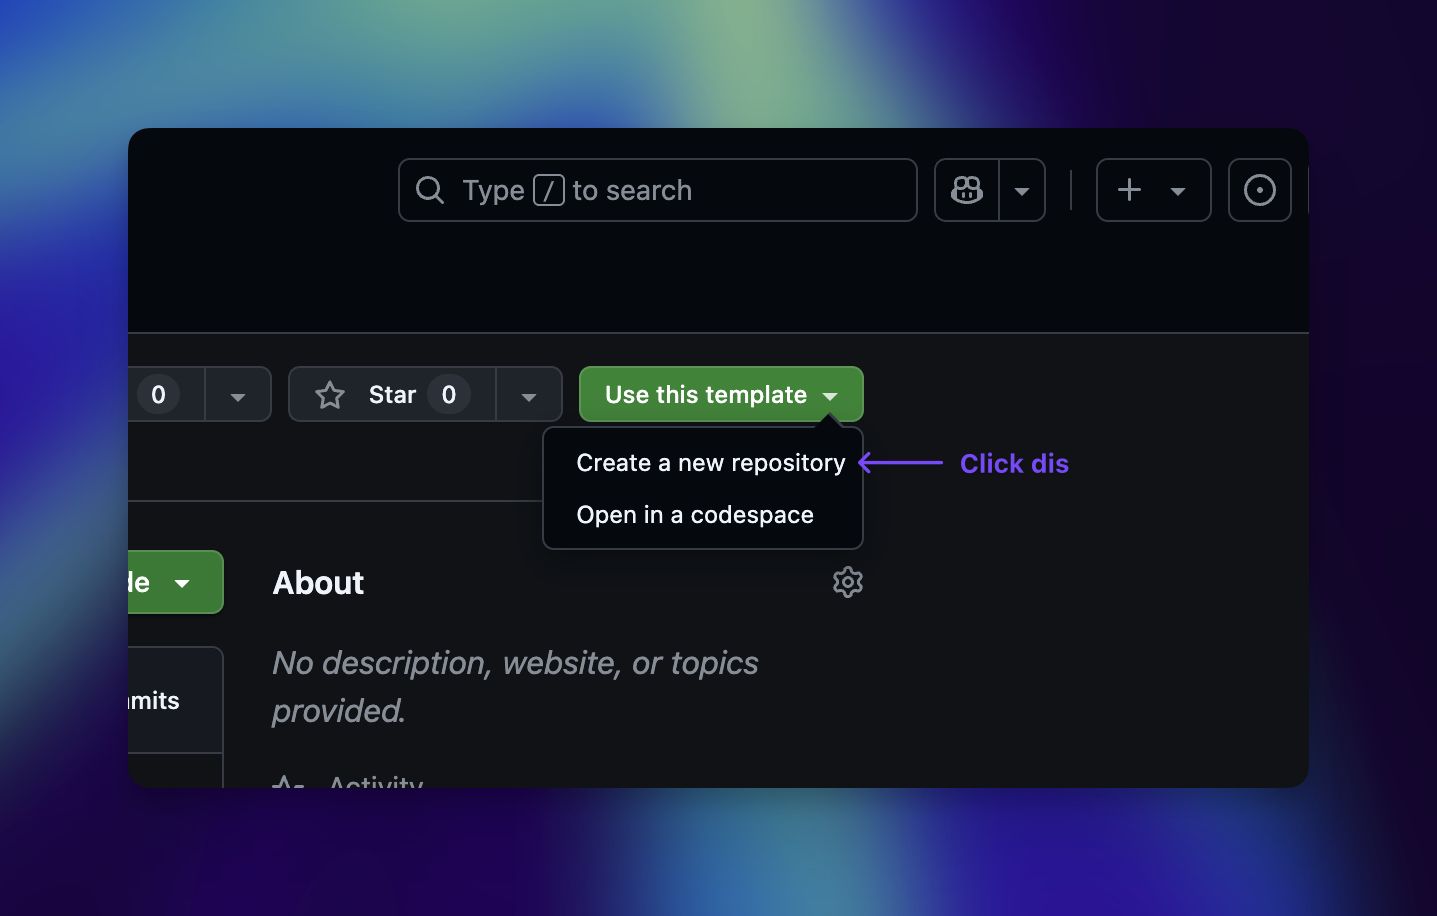
This will create a clone of the project within your own GitHub account. Name it as you please. Typically, I set the repo (short for "repository" aka a folder) to be private.
7. Get the code on your computer
We need to clone the project/code we just setup in GitHub onto your computer. To do this, open GitHub desktop, click "File" in the very top bar, then select "Clone Repository..."
Here, you should see the project that was just created in GitHub. If not, click the refresh button. At the bottom of the pop-up, you should also see a field labeled "Local path". This is where the code will be saved on your computer.
Typically, I like to store my projects in a "Sites" folder I create directly under the user folder like:
/Users/mikestilling/Sites/repository-name/If you don't know how to access that folder, just create a "Sites" folder within your "Documents" folder and save the code there.
Once that's all set, click the "Clone" button on the pop-up.
🔥 Fire-up the code
Congrats, we now have all we need to get this project running! The following steps will help you open the code up in Cursor and run it.
1. Open the code in Cursor
To start, we need to open up the project we just cloned in Cursor. To do this, open Cursor, click "File" from the very top bar, the select "Open Folder..."
Unlike a design file, code projects are typically consist of a collection of files and folders within an overarching folder (aka "repository"). In the Finder window that opened, find the folder we just created and open it.
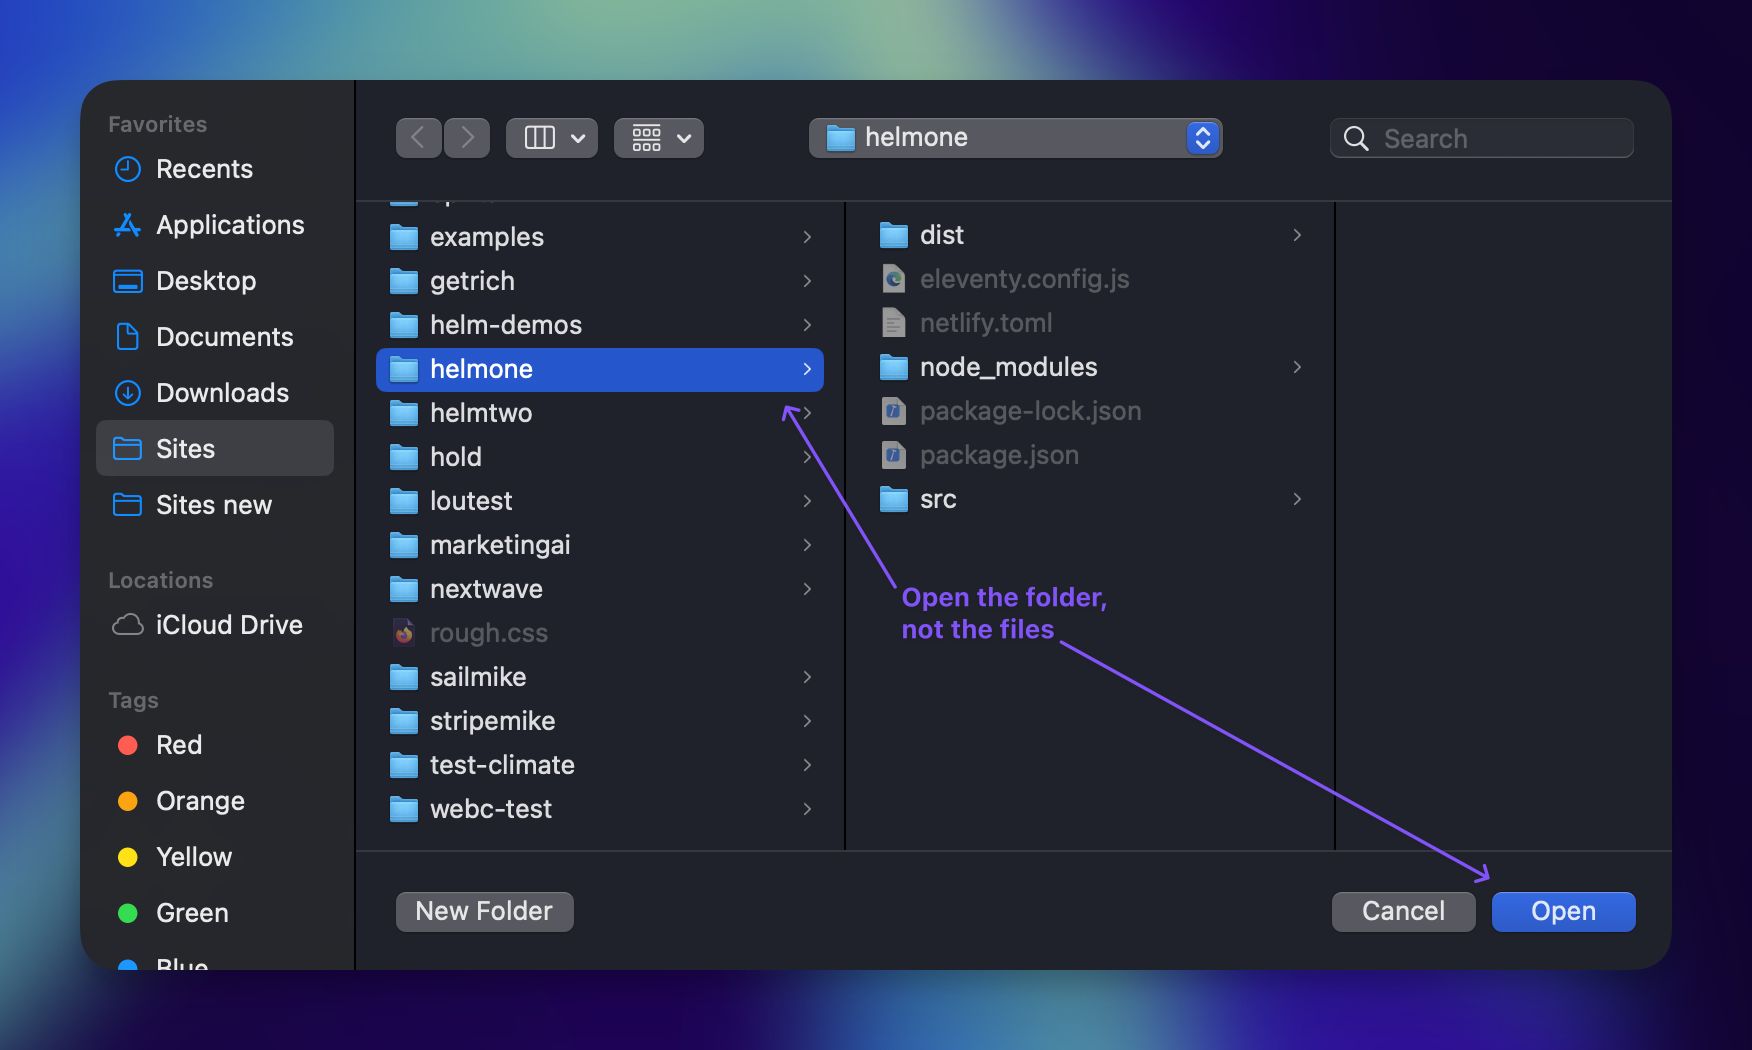
You should now see the files within this project listed out in the left side bar within Cursor. If you don't, reach out to @mikestilling.
2. Install the dependencies
Now, our NPM installation from earlier will come in handy. This project is a NodeJS project that has "dependencies"—in plain speak, this means it uses some other people's code, too.
Since this code can be quite bulky/bloated—it's witheld from GitHub via the .gitignore file that you'll notice in the left side bar.
To install these, all we need to do is run a simple script within Cursor. To start, click "Terminal" from the very top bar, then select "New Terminal".
This should pop open a terminal along the bottom edge of your Cursor UI. This terminal will already be "scoped" within this project—which makes it a lil easier to use than the default MacOS terminal.
To install the dependecies, simply copy/paste (or write) this into this terminal and hit the enter key:
npm iYou should see a bunch of weird shit happen in your terminal, this is normal. It may have a couple of warnings, this is no big deal. You should now see a "node_modules" folder that's grayed out in the left side bar.
If there are errors or failures that appear, Slack @mikestilling.
3. Run the code locally
Now that we have dependencies installed, we can "run" the code. To do this, simply copy/paste (or write) this into this terminal and hit the enter key:
npm startAgain, some wild things will happen in the terminal—totally normal. Red text is bad, green text is good. Lots of red? Slack @mikestilling.
This script just ignited a development server with "hot reloading". TLDR; Now when we edit code, we can preview what that looks like on the site in realtime. You should see a "port" or URL where the site can be viewed.
This URL is most likely: localhost:8080. To view the site, simply type that address into your browser (or click here).
You'll also now notice a dist folder appearing in the left side bar. The code in src is transformed into this. This folder is also ignored by git. Usually, we don't have to do anything with dist (this is just the outputted code, aka the code actually rendered in the browser).
Again, any issues? Just Slack @mikestilling.
Start coding
With our dev server running, we can finally start writing some code. We'll start with something simple. This will seem pretty lame, but we'll kick things up a notch later on.
1. Edit the demo page
The src folder is where primarily we'll be adding and editing code. Click the folder in the left side bar to expand it. You should see a demo.webc file. Click that file to open it up in Cursor. Separately, in your browser, navigate to localhost:8080/demo/.
If you've dealt with HTML in the past, the contents in this file with Cursor should look fairly familiar. Let's start by swapping out the content within the <h1> tag. Currently, it says: "Hello this is a stripe.com page"—delete that and insert your name.
After doing this, tap ⌘S to save the file and navigate back to the localhost:8080/demo/ page. You should see this change automatically updated there.
2. Create a new page
You'll notice the file named demo.webc automatically publishes with the /demo/ slug. While we can overwrite this, this is the default behaviour of this project.
Let's imagine we wanted to create a new page with a slug of /test/. All we will need to do is create a new file with the name of test.webc.
To do this, we'll simply right-click on the folder named src in the left side bar and select "New File..." then type "test.webc" as the file name.
By default, this blank new file should open up within a new tab in Cursor. Rather than starting from scratch, lets hop back over to the demo.webc tab and copy all the contents, then paste them into test.webc.
We'll start customizing this page by first editing the "frontmatter". The frontmatter are the details between --- at the top of the page. Like:
---
layout: "main.webc" #The template this page should use
title: "Stripe prototype" #The page's title within the project
seoTitle: "Stripe | Prototype" #The title that is displayed when the page appears in search results (also appears in browser tab for page)
ogTitle: "Stripe | Prototype" #The title that is displayed when the page's link is shared on social channels
seoDesc: "SEO description goes here" #The description that is displayed when the page appears in search results
ogDesc: "OpenGraph description goes here" #The description that is displayed when the page's link is shared on social channels
ogImage: "/assets/images/og/default.jpg" #The image that is displayed when the page's link is shared on social channels
ogImageAlt: "" #The alt text for the image that is displayed when the page's link is shared on social channels
changefreq: "weekly" #The frequency that this page is changed (used for sitemaps)
---
Most of the stuff within frontmatter is metadata. Honestly, it's not super important for most prototypes—but probably worth explaining.
Let's update this to be (feel free to copy/paste):
---
layout: "main.webc"
title: "Quickstart test"
seoTitle: "Stripe | Quickstart prototype"
ogTitle: "Checkout my first code-based Stripe prototype"
seoDesc: "A really boring page I made while going through a tutorial"
ogDesc: "A really boring page I made while going through a tutorial"
ogImage: "/assets/images/og/default.jpg"
ogImageAlt: ""
changefreq: "yearly"
---
After doing this, you should notice the title of the browser tab that you're displaying this page in reflects this change.
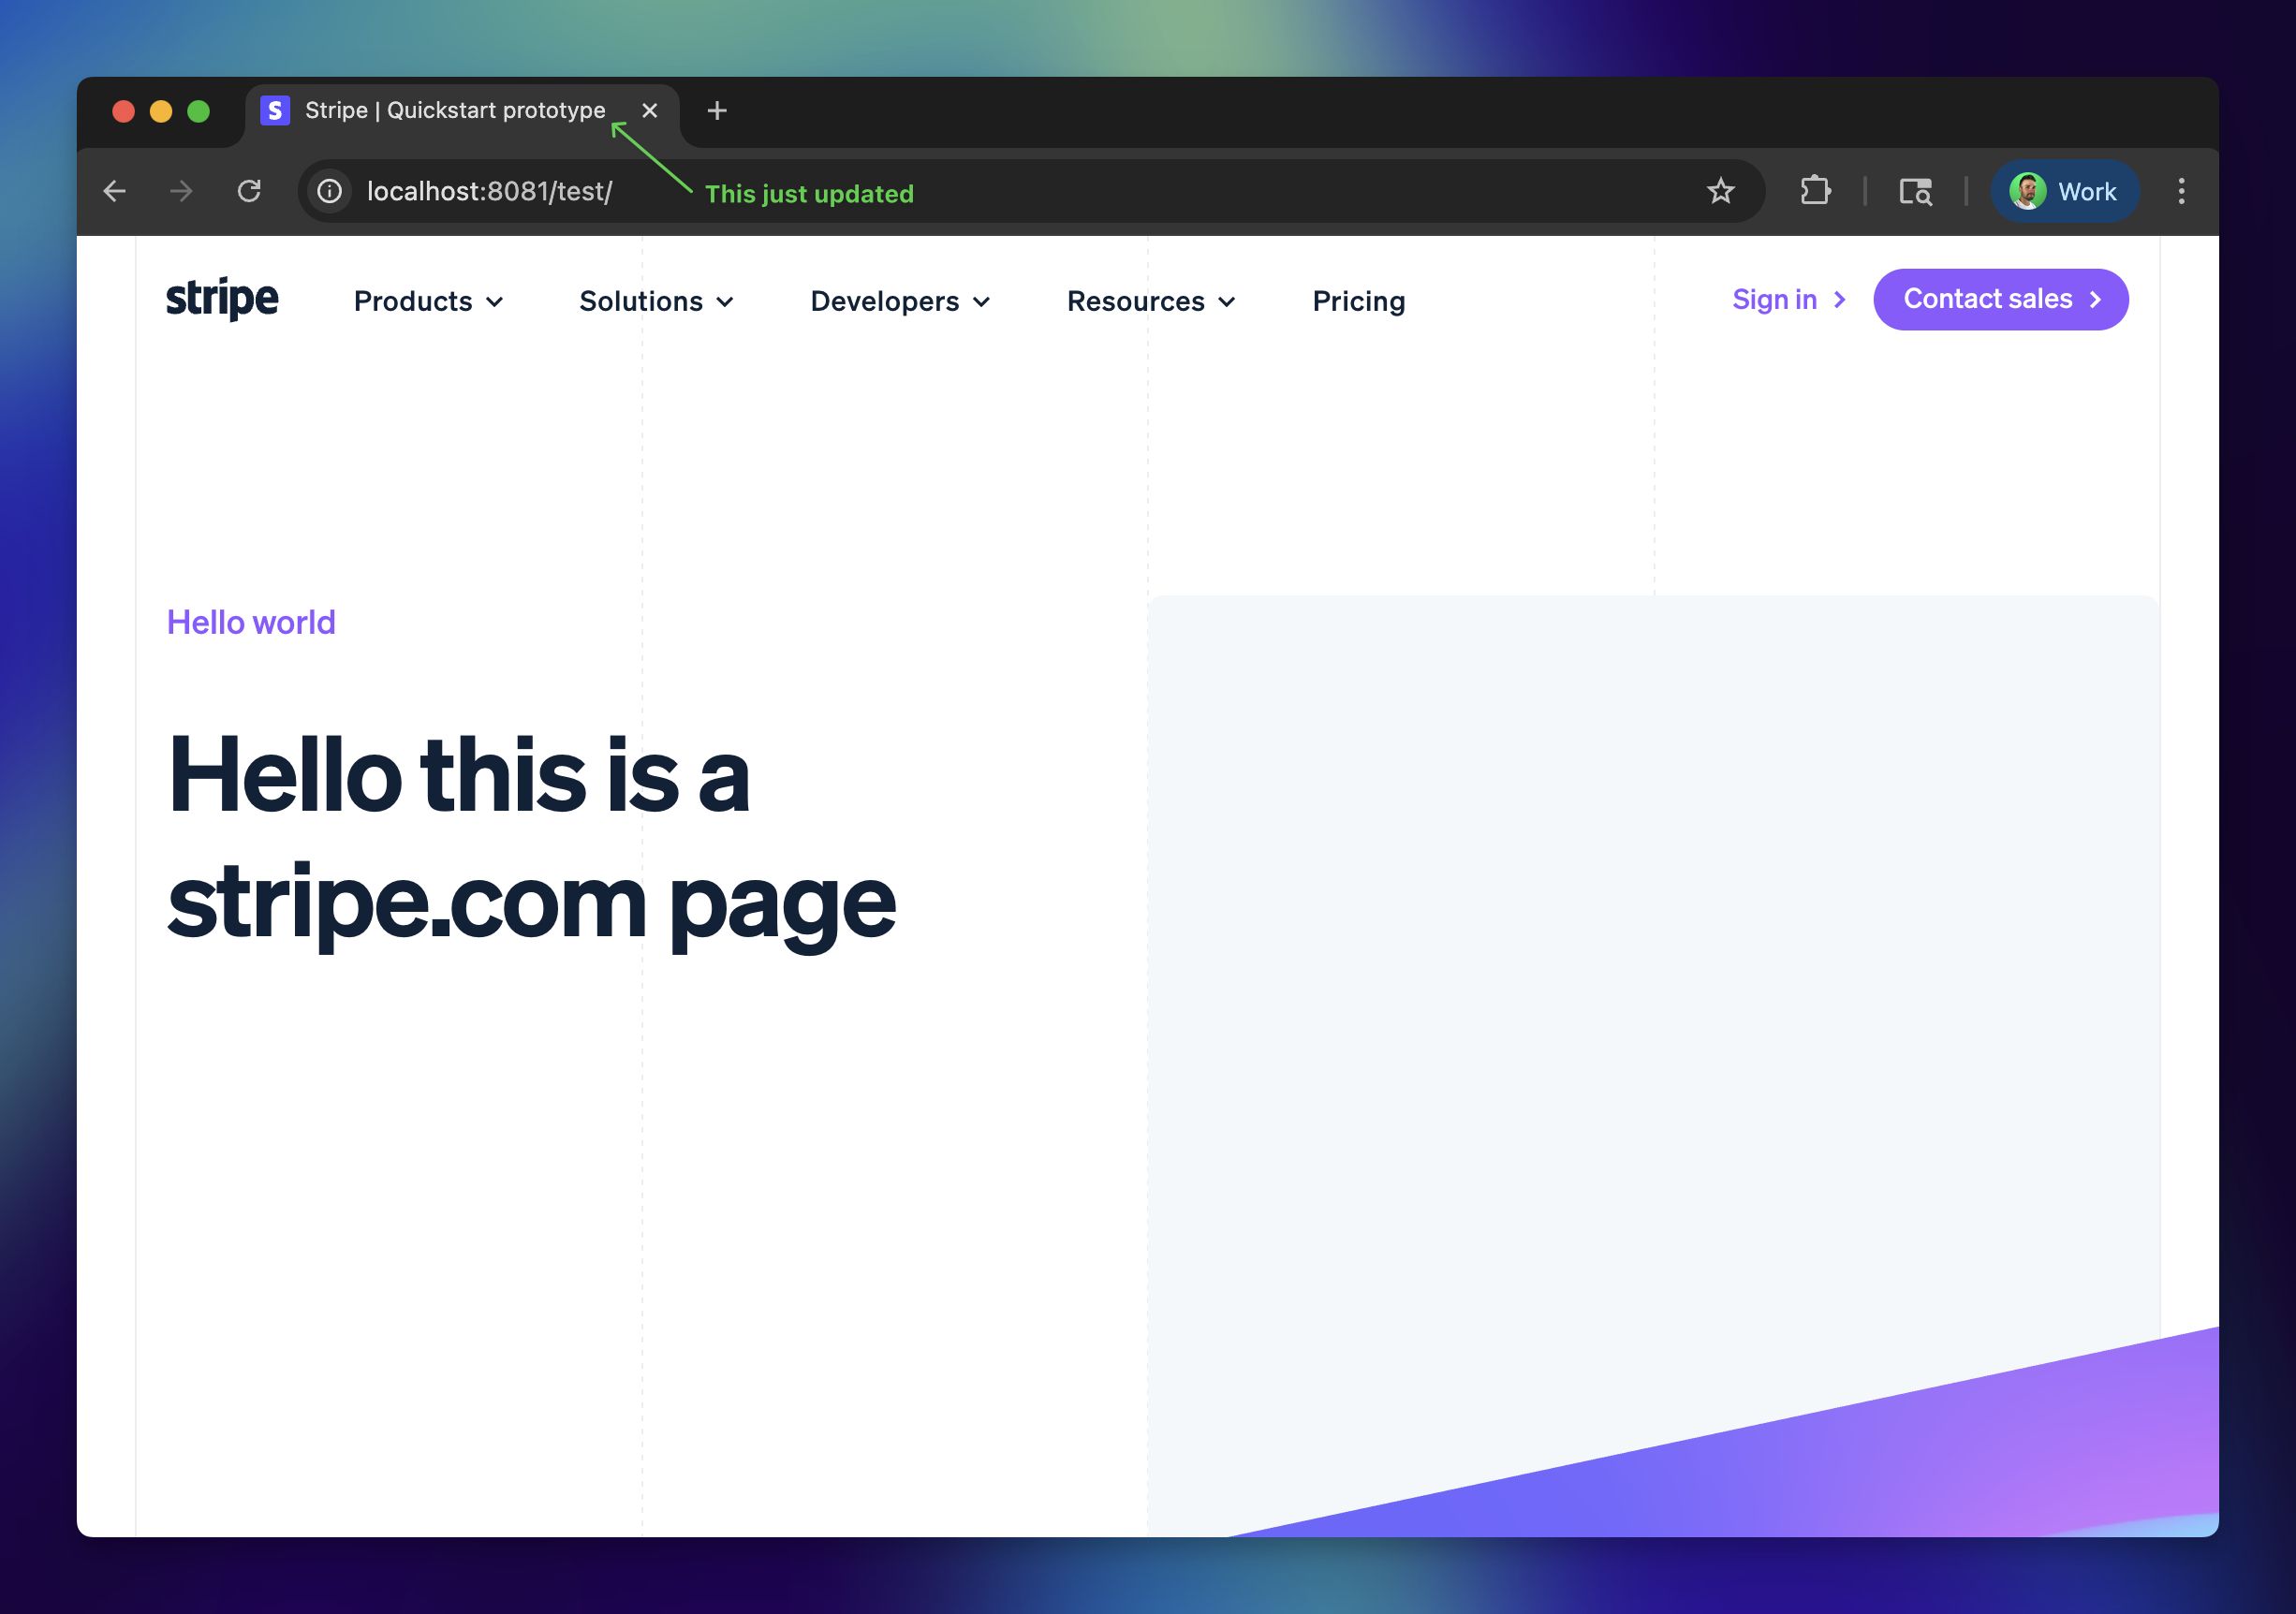
3. Commit and push the updates
By now, the files in your left side bar are all sorts of colors. All this indicates is their status within Git. More or less, that these files are new and/or have been edited.
To "save" these changes to Git, and then, GitHub—all we need to do is commit and then push them. Open up GitHub Desktop to make this simple.
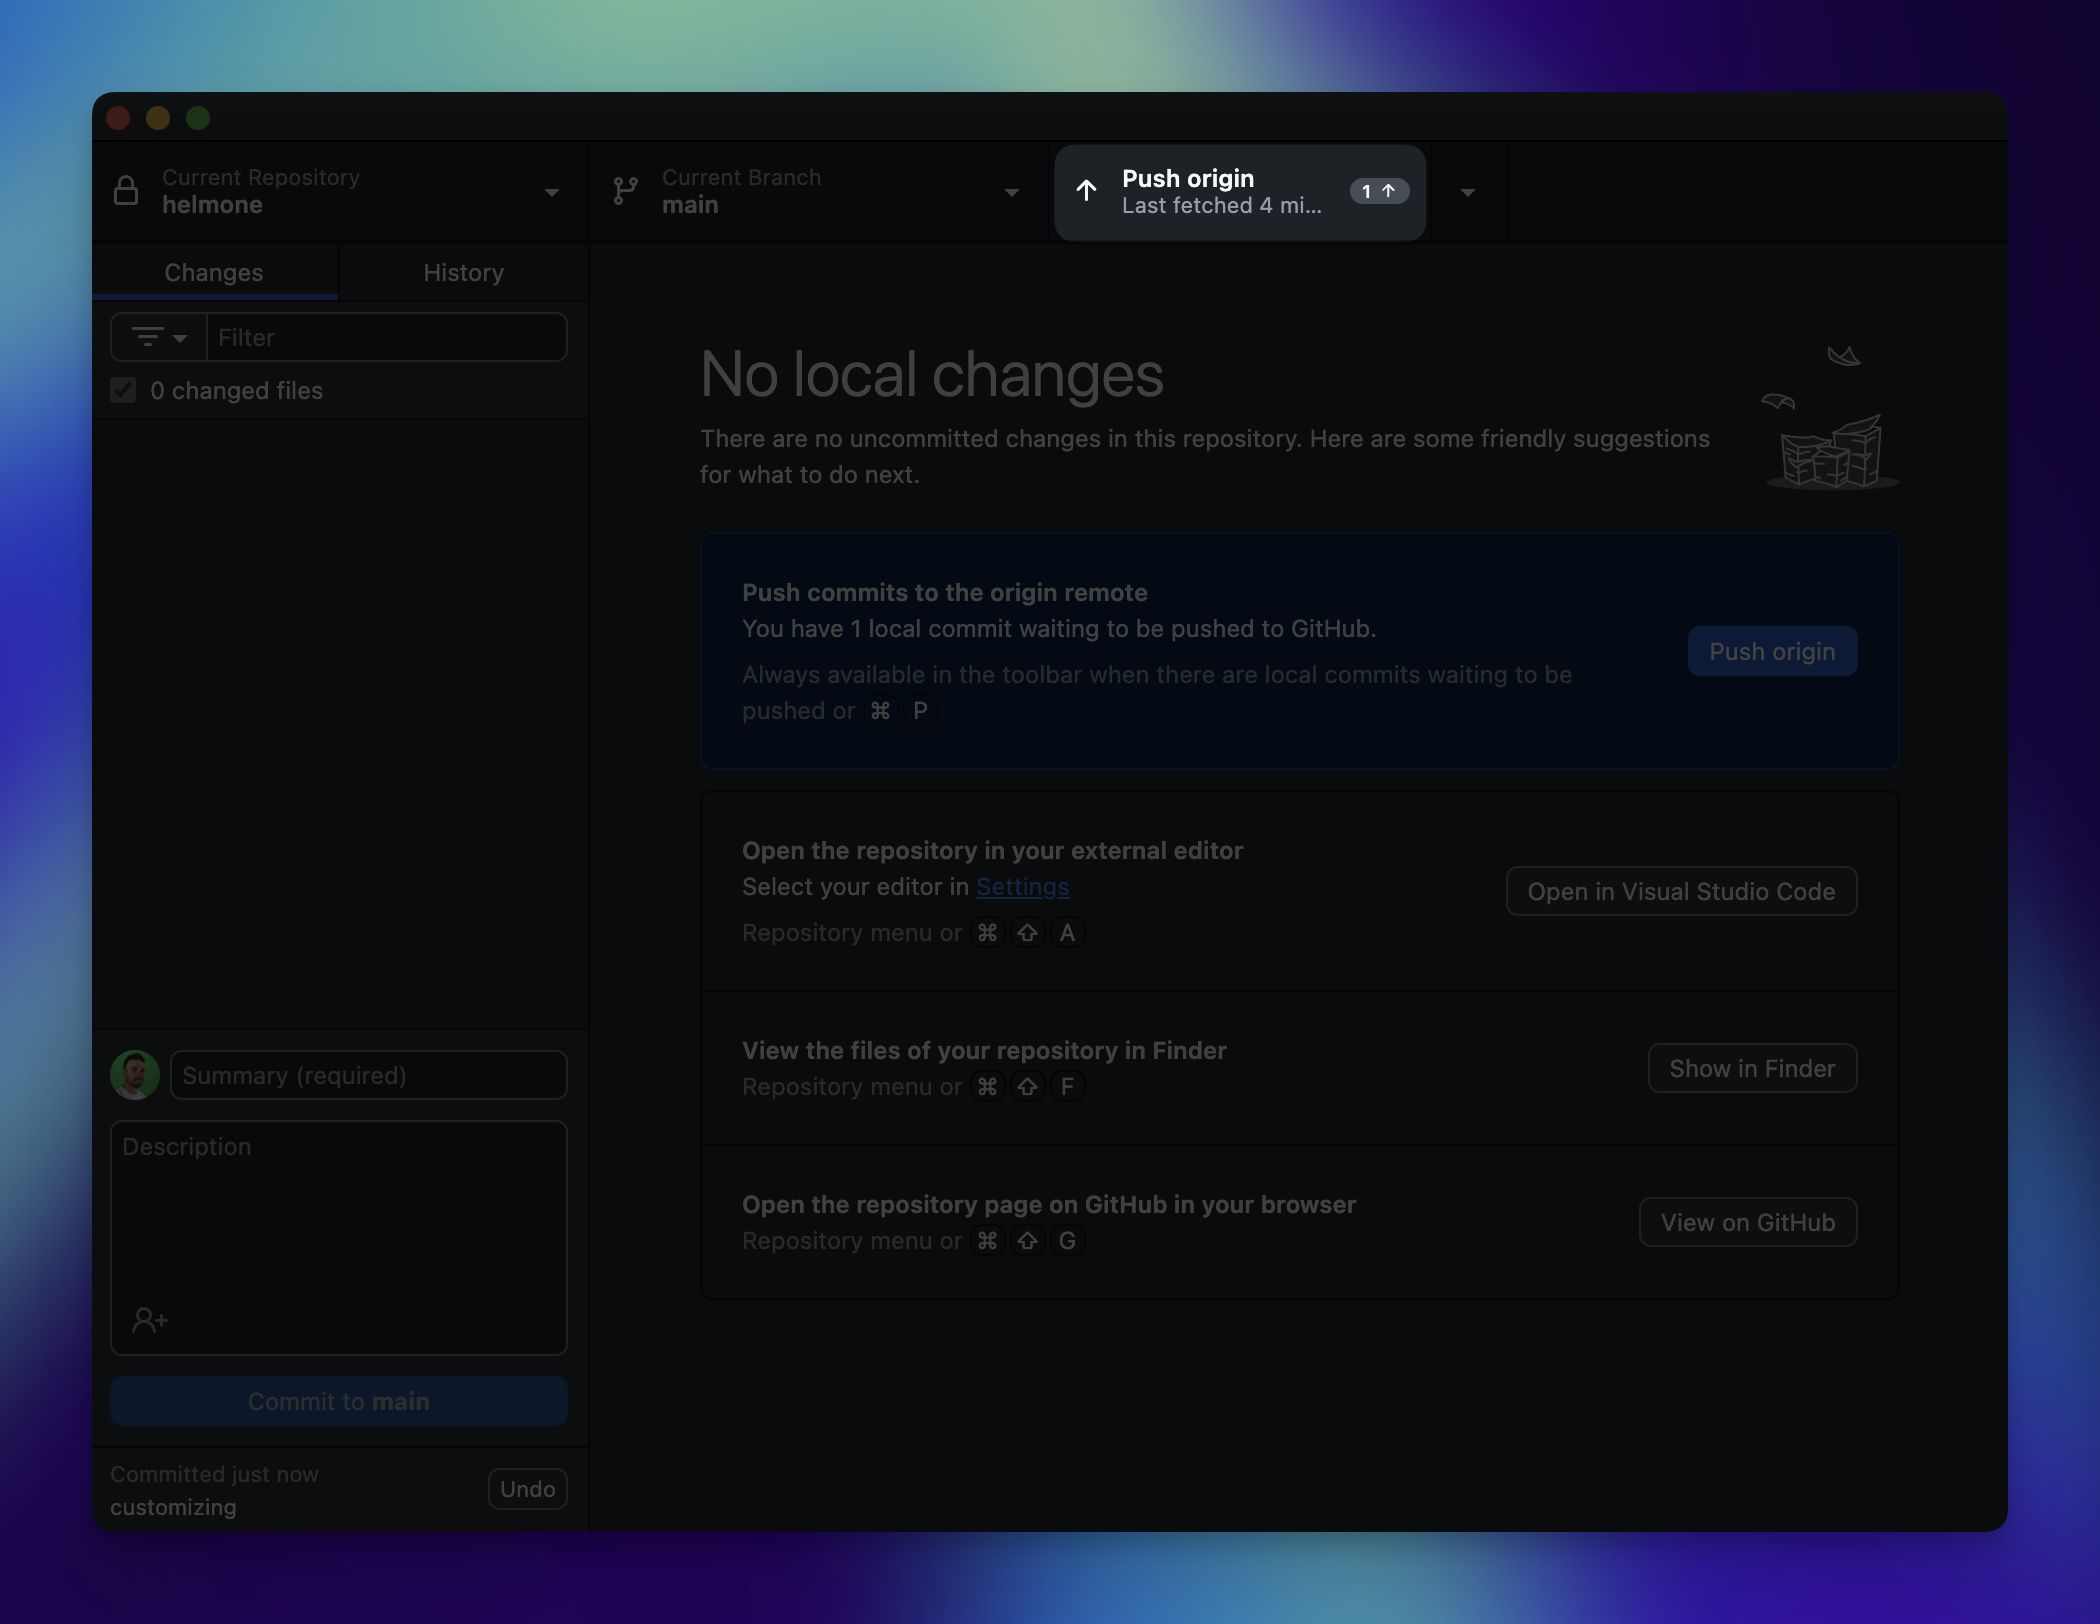
You should see the files that have been changed listed in GitHub Desktop. It won't be identical to the image below, but something like:
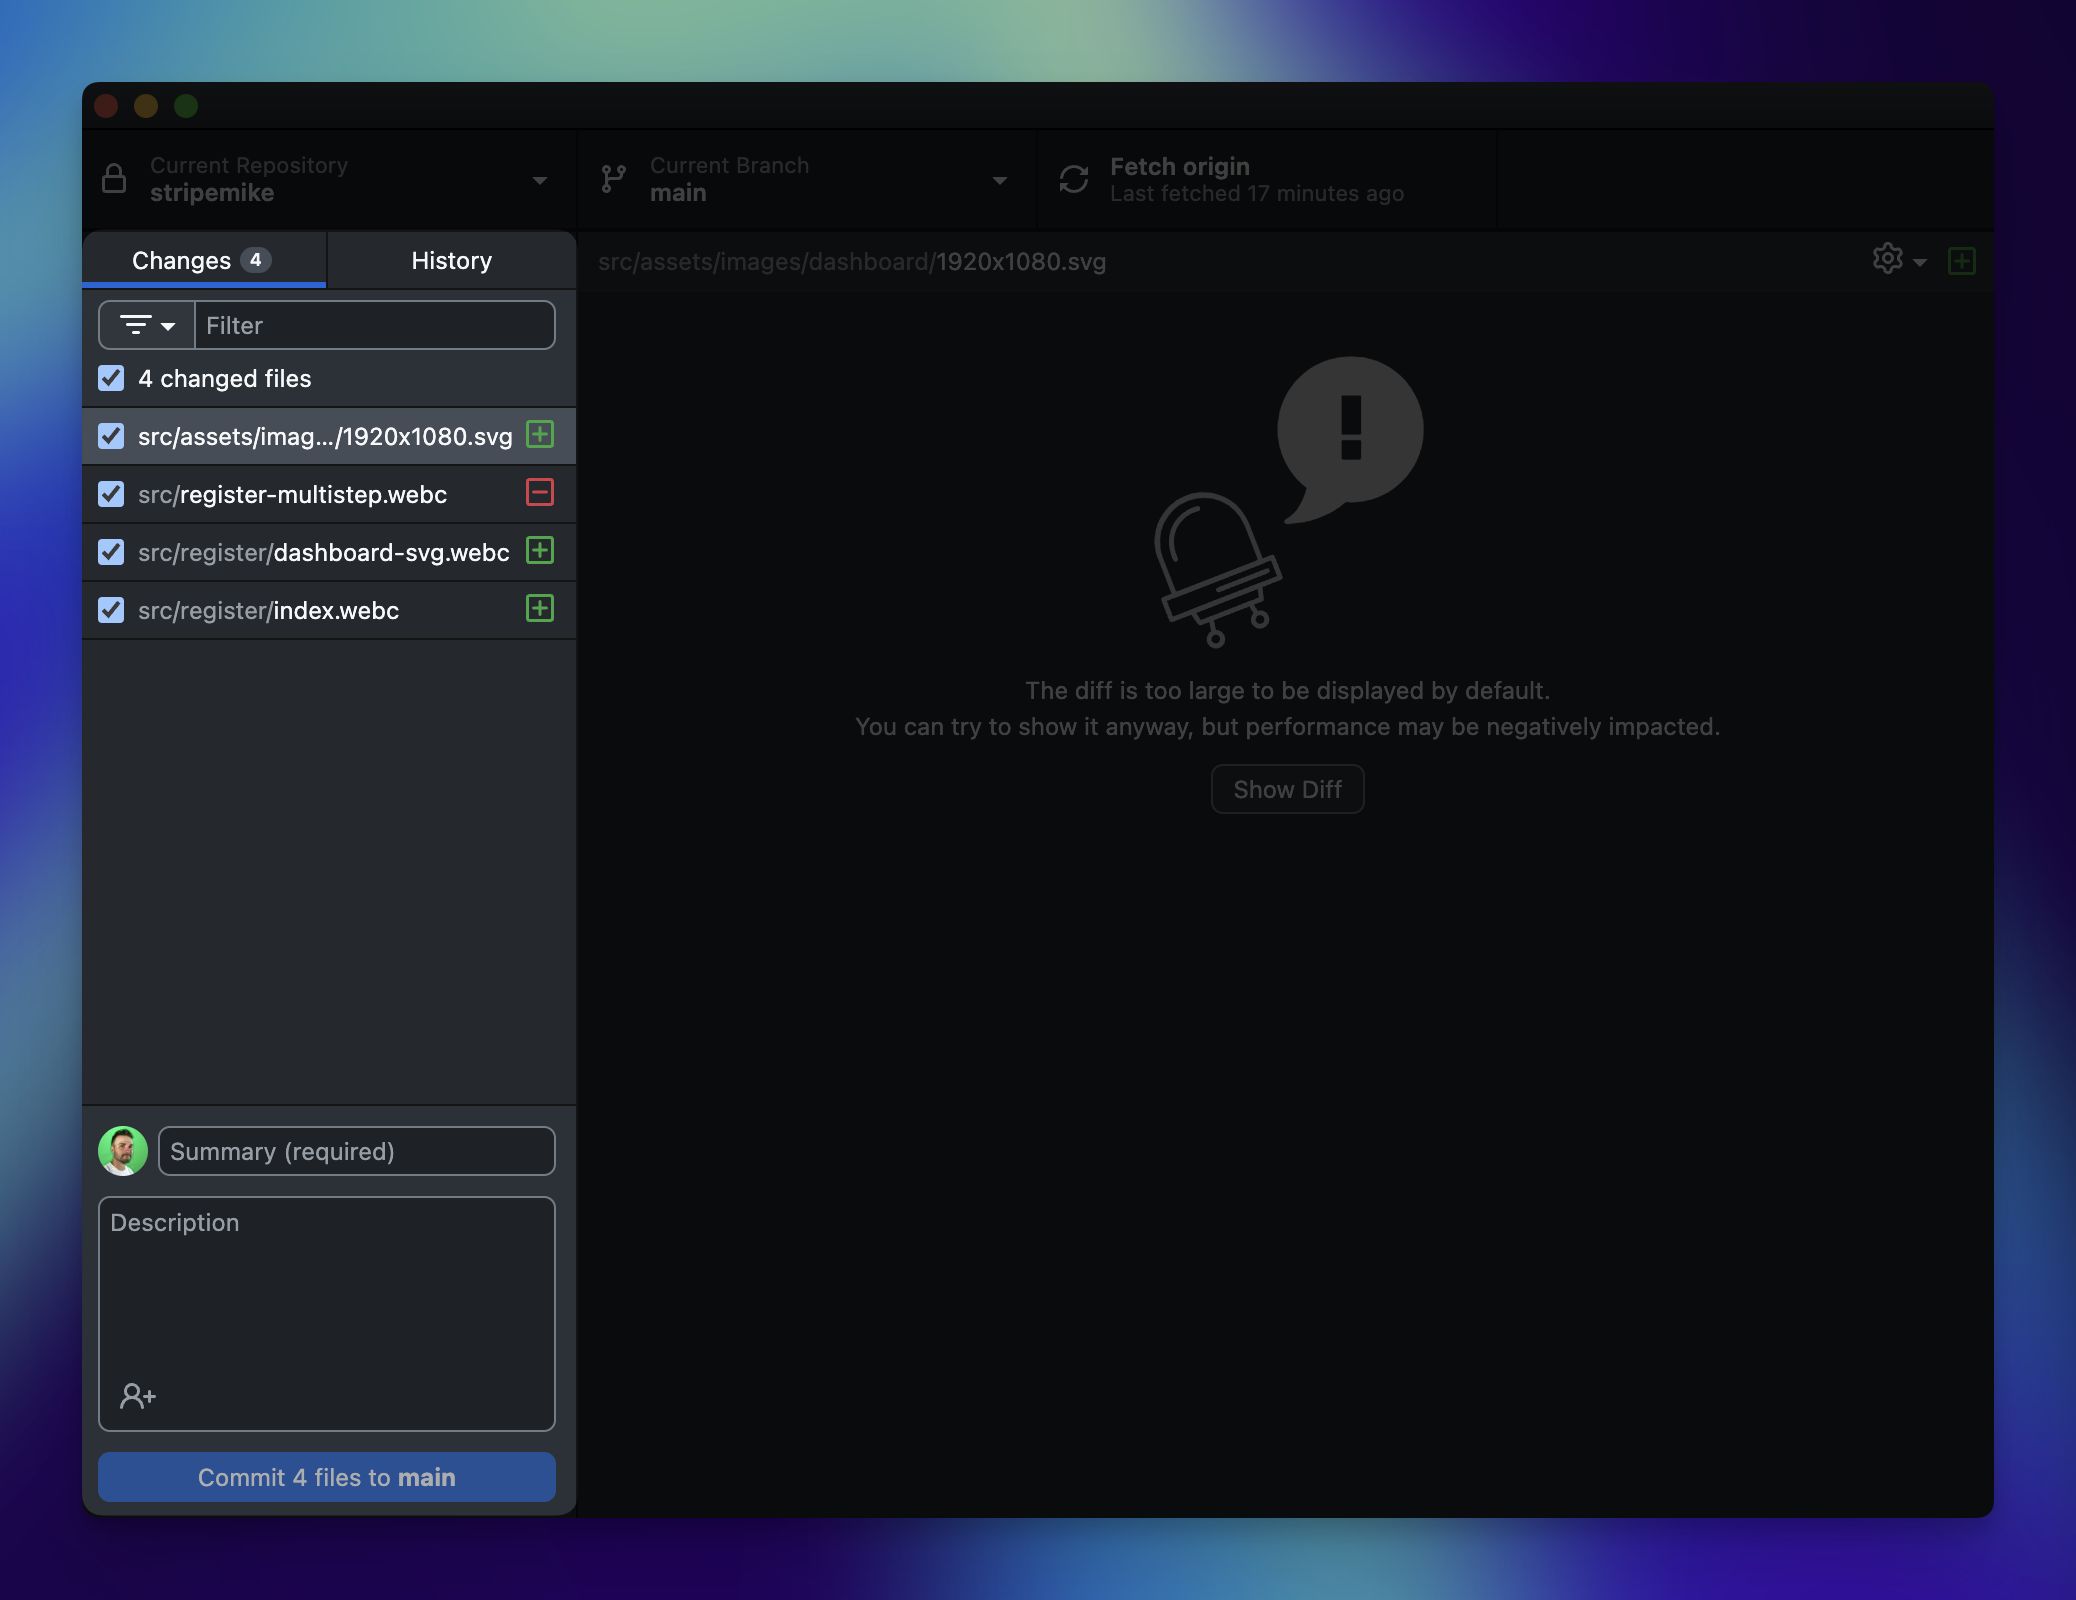
In the field next to your avatar, type "initial commit" and then tap "Commit X files to main". This commits the changes we've made to Git.
After doing this, some updates will occur within the GitHub Desktop UI. Now, we'll need to push these changes to GitHub. To do this, we'll click the blue "Push origin" button, or click it up top on the UI here:
4. Kill the terminal
Back in Cursor, we still have out development server running in the terminal. To stop it, all we must do is click into it, then press ^C. To clear out all the junk, type clear into the terminal and press enter.
If you want to make more changes and fire the dev serve back up, just run NPM start in the terminal again—and repeat.
🚀 Publish to the world wide web
With all of this in place, all that's left to do is connect our code to a hosting platform so that our website has a home on the internet.
To do this, we can make use of tools like Netlify or Vercel. Platforms like these will connect to our GitHub account, grab our code, run the necessary scripts to output it into something browsers understand, and then, host that code so it's available at a public URL.
1. Create a Vercel account
Go to Vercel and create an account. Select that you're using it for personal proejcts. Create the account using the same email address you used to create your GitHub account.
2. Import the repository
You'll be asked to "Import Git Repository", select "Continue with GitHub". You will be asked to authenticate into your GitHub account and allow access. After doing this, tap "Import" on the repository for the project we've been working on.
3. Deploy the project
The project setting have already been configured, now, all you'll need to click is "Deploy". The site will "build" for a ~1 minute. After, you should get an option to "Continue to Dashboard"
4. View the site
Within the Vercel dashboard, you'll see a link to your live website under "Domains", click that to see the site in action!
5. Next steps
Going forward, anytime you push changes to GitHub from GitHub desktop (after making edits to your code in Cursor) Vercel will automatically detect this and redeploy the site with these changes at the same link. 🎉
To view your specific pages, just add the slug to this Vercel URL, like yoursite.vercel.app/test/.
🍃 How this works (from here on out)
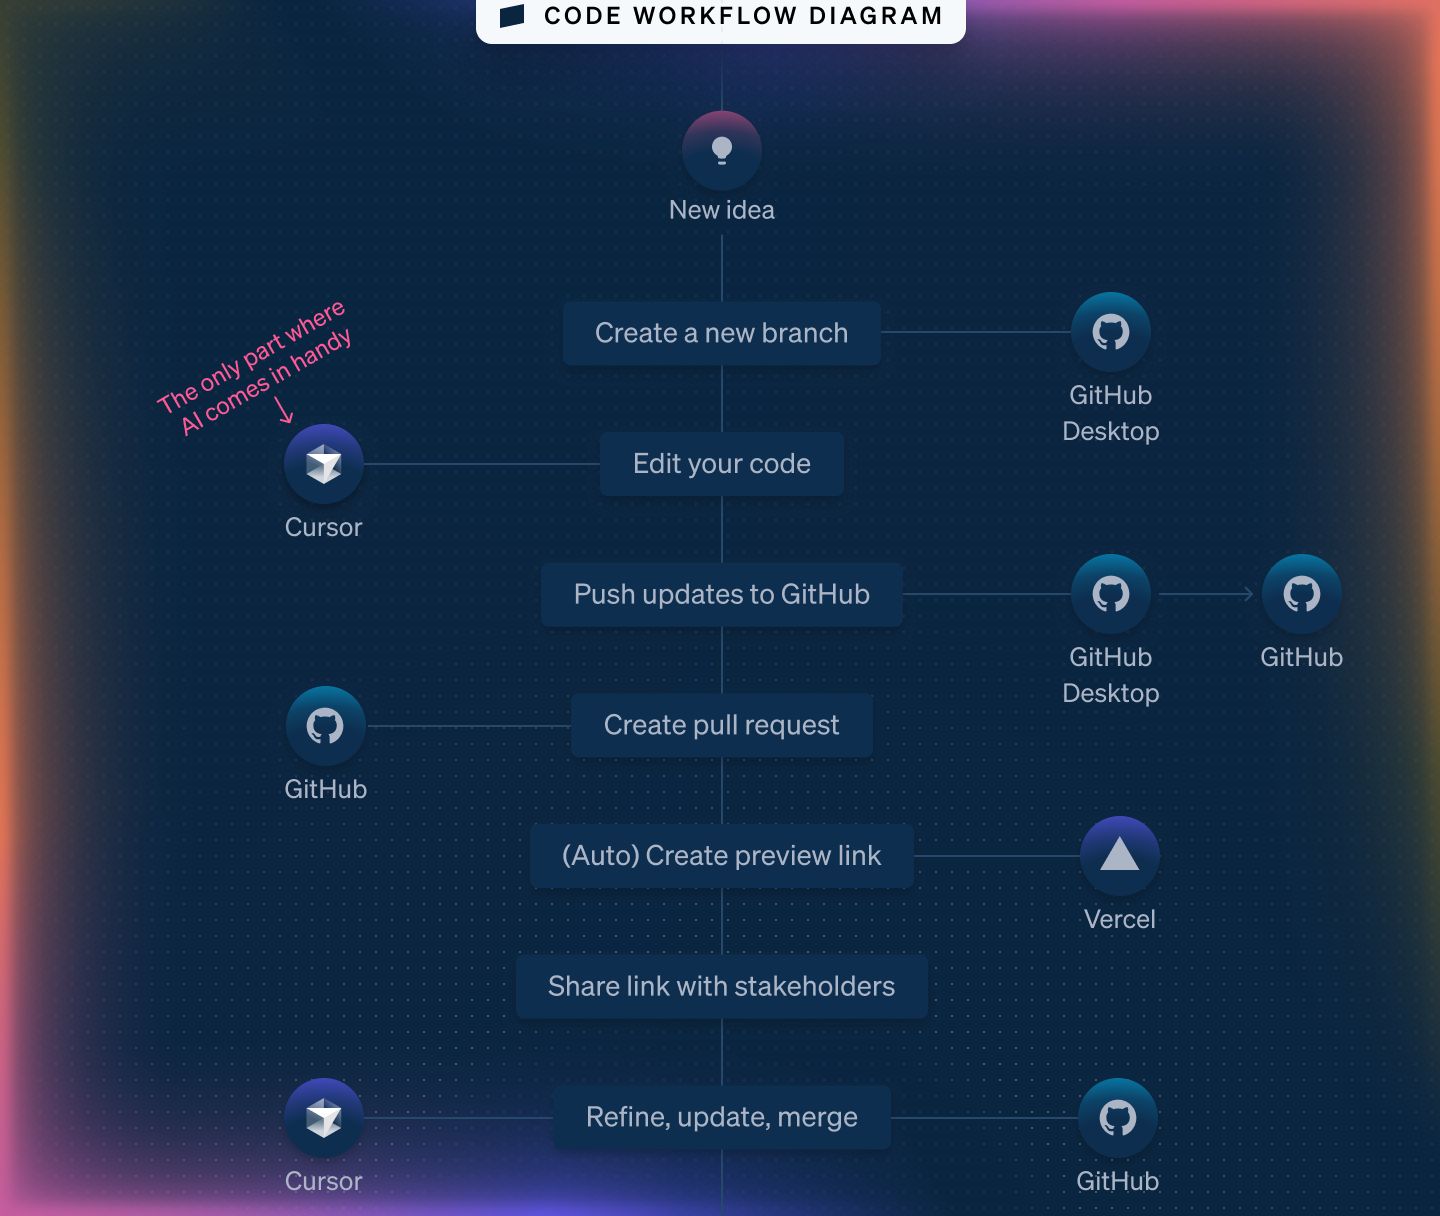
Now that we have all of the tools and code in place, we never have to do most of this ever again. From here on out, all we need to do is:
- Add and update code in Cursor
- Commit and push that code to GitHub
- Optional: Share links (from our Vercel site)
But, how do I transfer my designs to code?
Largely, Figma only allows for common CSS stylization/placement. As such, to reconstruct Figma designs in code will rest on translating the visuals there into CSS and HTML within files like we created above. From there, we'll use JavaScript (and GSAP) to add anything fancy like timeline-based animations.
To cover all of that here would make this page 10x longer than stripe.com's homepage. Instead, schedule some time to work 1:1 with @mikestilling to get a hand getting started.